With the official Pax app no longer downloadable from the App Store, I needed a new way to control my devices that’s a little more polished than the previous proof-of-concept Mac app I wrote. As it’s been a while since I last touched iOS development, I figured it’d be a fun challenge to write an app in a weekend.
Background
The official first-party Pax app has been unlisted from the App Store for a few years now since Apple instituted their ban on vaping-related apps. However, during that time it remained available to download from the “Purchased” section of the App Store: that seemed to have changed at some point recently. I didn’t feel like messing with sideloading the app, so it’s time to finally do what I set out to do a year ago: replace the Pax iOS app.
It is worth noting that Pax’s official “solution” to the unlisting of the app has been a janky custom browser whose only purpose appears to be to provide Bluetooth APIs to the websites it loads. This sucks because now using the device effectively requires a working Internet connection.1 That completely ignores the fact that the UX of a web app is simply so much worse than a proper native app. But given Apple’s stance on vaping apps, I (unfortunately) don’t see how they could do any better.
Device Communication
Thankfully, I already did most of the hard work of reverse engineering the Bluetooth protocol last year to write that Mac app. I suggest reading those earlier posts (or even checking out my docs) if you’re interested in the details of the protocol.
Even better, back when I wrote that proof-of-concept app, I knew I would want to write a proper iOS app at some point. Most of the device interfacing was encapsulated into self-contained classes and is reasonably simple to deal with. I still haven’t implemented an automatic reconnection mechanism, but this seems to be much less of an issue with the iPhone than Mac: my running theory is that the firmware on devices closes connections below a certain RSSI.
All of the Pax-specific device communication lives here.
Establishing Connection
This was likely the most annoying part of this entire thing: connecting to a device. I didn’t do a very thorough job of reverse engineering the original app to figure out how it discovers and connects to devices, nor how it handles pairing.
A key part of this entire deal seems to be the manufacturer-specific data that’s sent as part of the Bluetooth LE advertisement packet2 by the devices. I haven’t completely decoded the meaning of this data for Pax devices – it’s usually 15 or 16 bytes in length – other than that 8 bytes, starting at offset 2, contain the device’s serial number as an ASCII string3.
So, when trying to connect a device, we just scan for any Pax and then try to find the device with a manufacturer data blob with the corresponding serial number. This seems to work decently, so I’m (probably?) not too far off from how it’s supposed to work.
Message (De)Serialization
Swift makes building custom types with special serialization and deserialization behavior super simple. As I alluded to in previous posts about the protocol, each message is represented by a Swift struct, which implements one of the following protocols:
1
2
3
4
5
6
7
protocol PaxDecodableMessage: PaxMessage {
    init(fromPacket packet: Data) throws
}

protocol PaxEncodableMessage: PaxMessage {
    func encode() throws -> Data
}
Since the first byte of a message always indicates its type, decoding the (decrypted) messages then becomes extremely simple:
1
2
3
4
5
6
7
8
9
10
11
12
13
internal func processPacket(_ packet: Data) throws {
    switch packet[0] {
        case PaxMessageType.LockStatus.rawValue:
            let message = try LockStateMessage(fromPacket: packet)
            self.isLocked = message.isLocked
        case PaxMessageType.Battery.rawValue:
            let message = try BatteryMessage(fromPacket: packet)
            self.batteryLevel = message.chargeLevel
        // ...snip...
        default:
            Self.L.warning("Received Pax message with unknown type \(packet[0]): \(packet.hexEncodedString())")
    }
}
This method is overridden in each of the concrete device classes to handle device-specific message types; while the base device class (PaxDevice) handles common messages, such as the battery level, lock state, and more. It also implements the (incredibly poorly thought out) “security” scheme, including the super secure (not really) key derivation.
Most of the message handling is driven directly by Core Bluetooth receiving unsolicited updates from the device, which get forwarded into the appropriate device class. Each concrete subclass exposes methods to set various states (which in turn will cause messages to be encoded and sent) and also exposes some state as local variables.
These variables can be observed, using the Combine framework; it’s got many, many cool features, but I’m just using it as a “poor man’s Cocoa Bindings” to update the UI based on device state.
Custom UI
Most of the app is implemented with pretty bog standard UIKit controls. However, there were a few areas that I needed to write some custom controls to get the feel I was after.
All view controllers in the app were laid out using Storyboards. I don’t think I’ve ever really used them before (I’m well aware they’ve been a thing for many, many years now… I guess I really liked my xib’s) but it was an extremely straightforward experience, and saved me from writing a fair bit of code.
Temperature Dial
The official app uses a traditional UISlider to set the temperature of a Pax 3 device, but has a nice circular slider for the Pax Era: why the difference, I have no idea – I think the circular slider works way better.
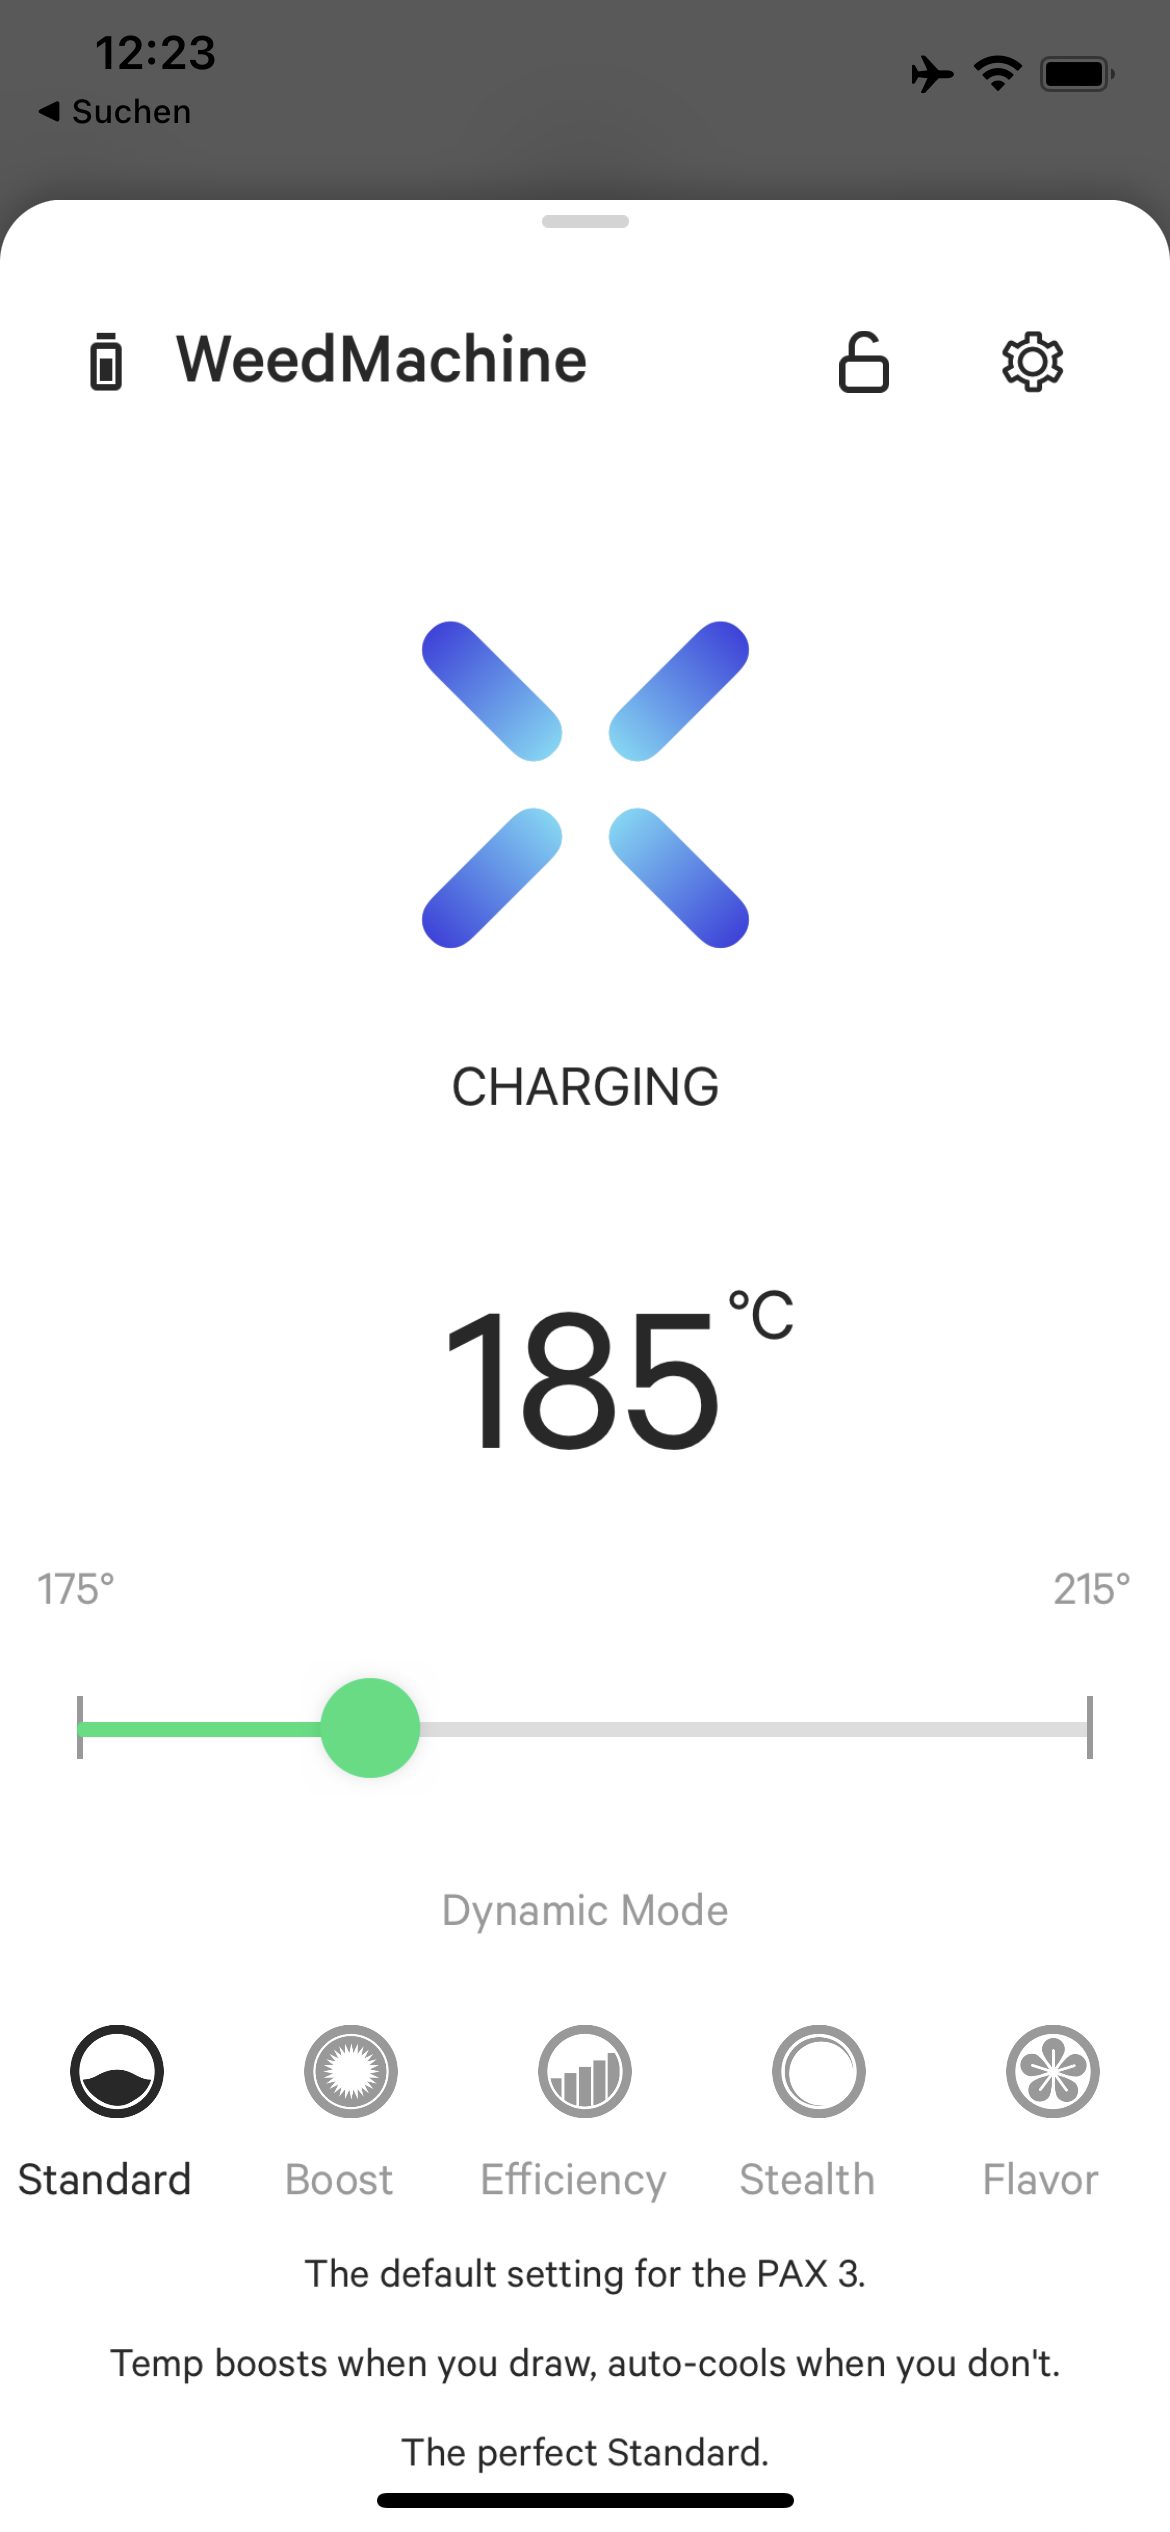
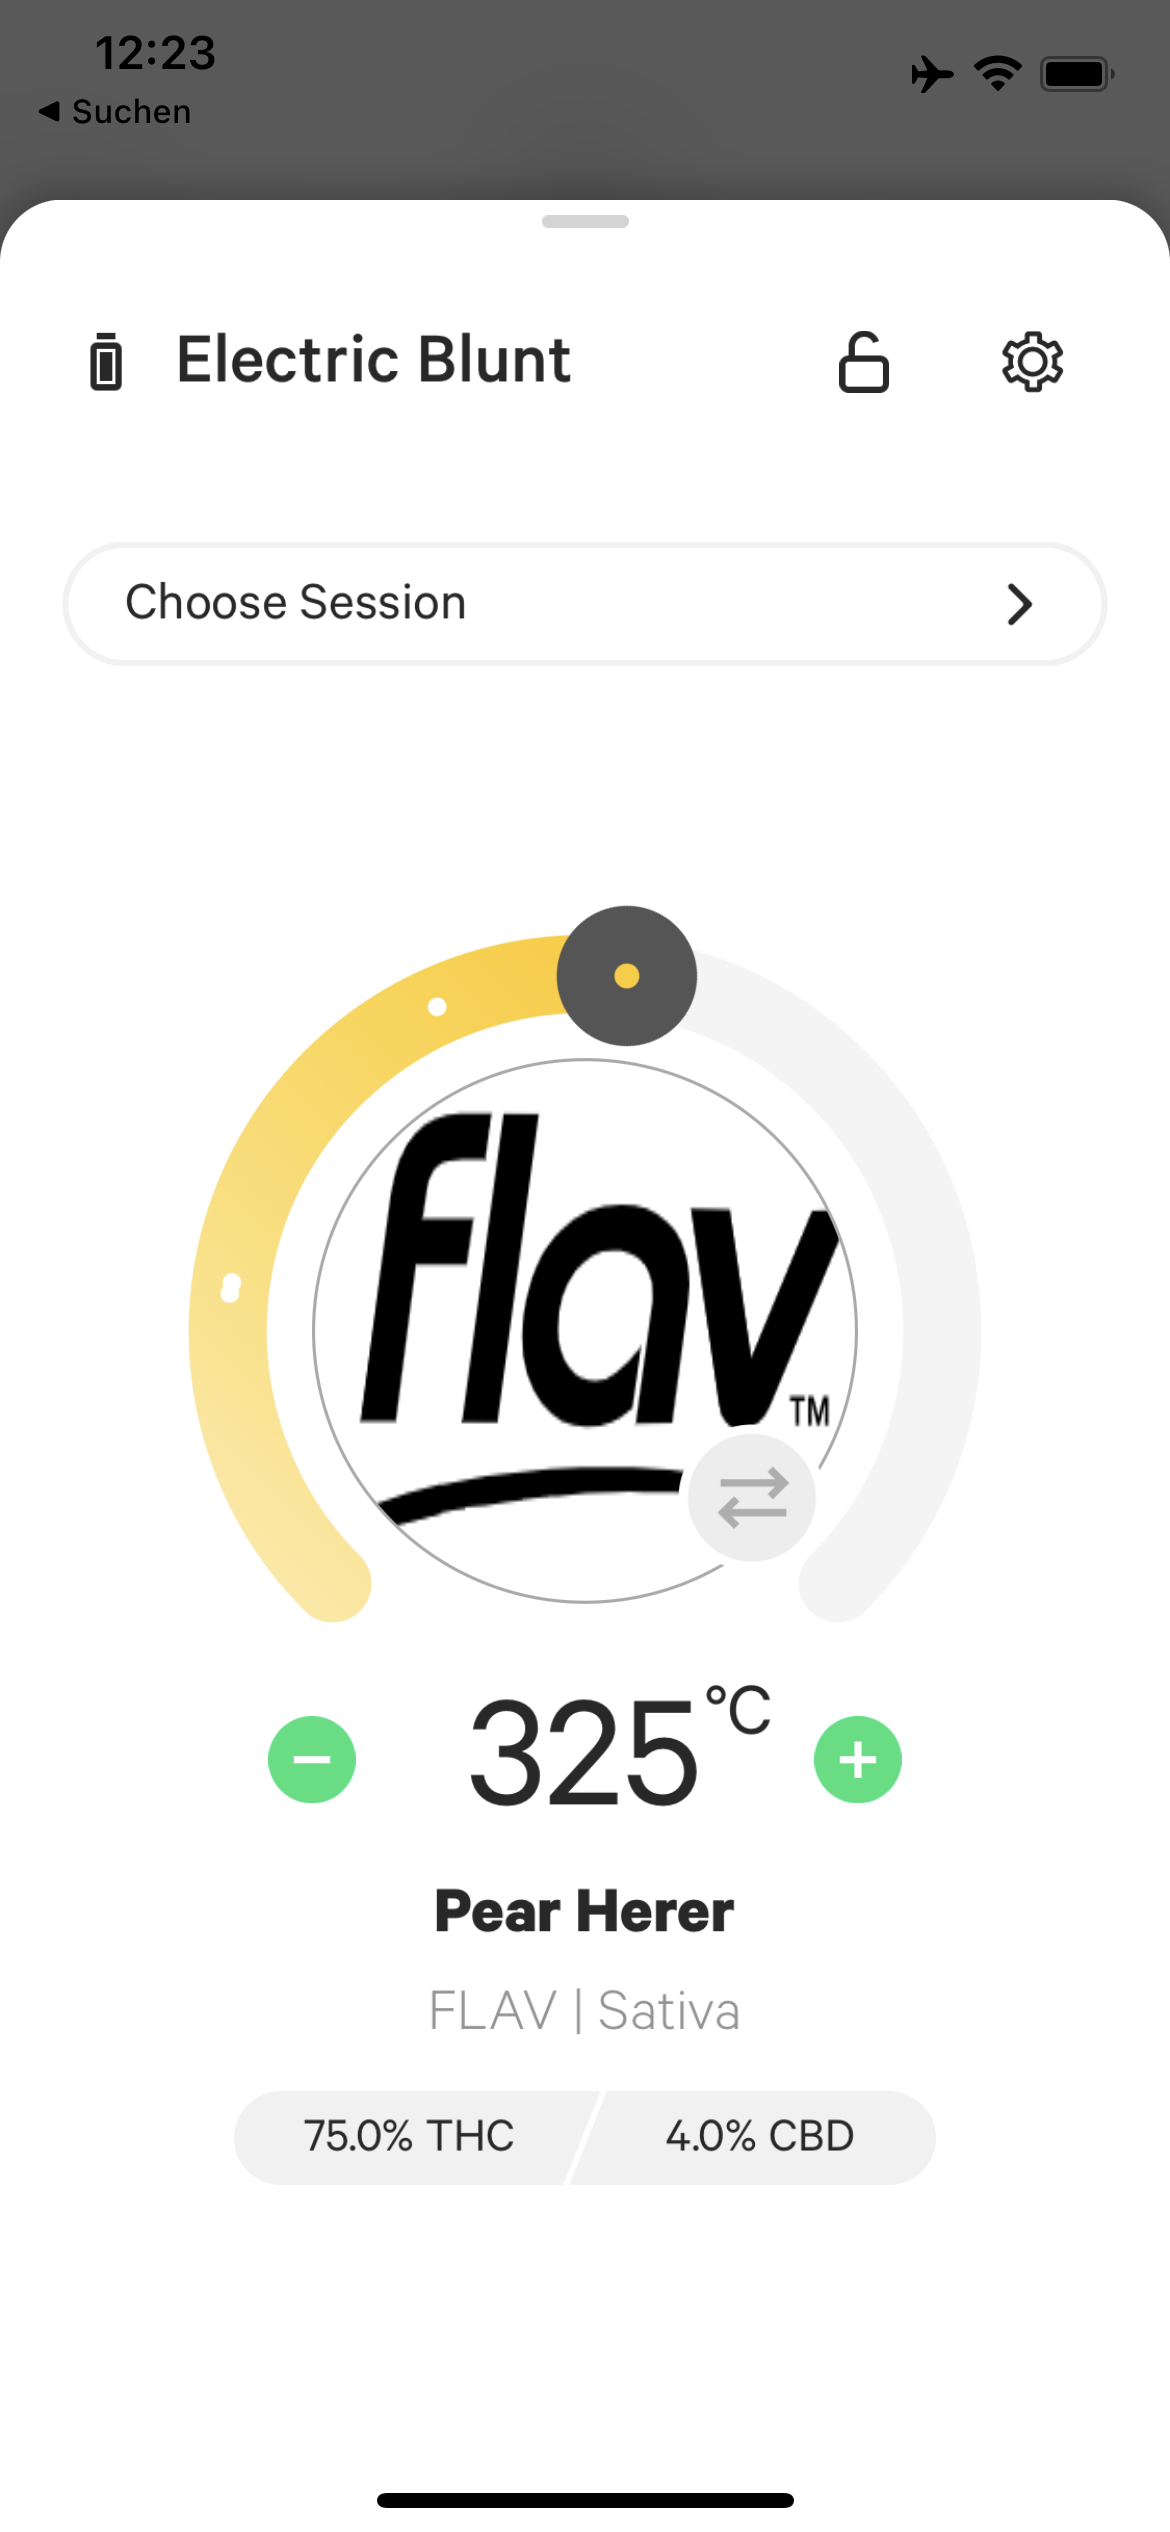
I wanted to use a nice circular slider to control the temperature. Unfortunately for me, circular sliders aren’t a system standard UI component, so I had to either find a suitable control online or write it myself.
While I tried several existing controls – HGCircularSlider, CircularSlider, and SVCircularSlider to name a few – I didn’t quite like any of them for one reason or another.
Off to writing a control, I guess.
Attempt 1
For this attempt, I started with the code for SVCircularSlider, intending to clean it up and understand how it works. I ended up pretty much rewriting the whole thing, but I digress.
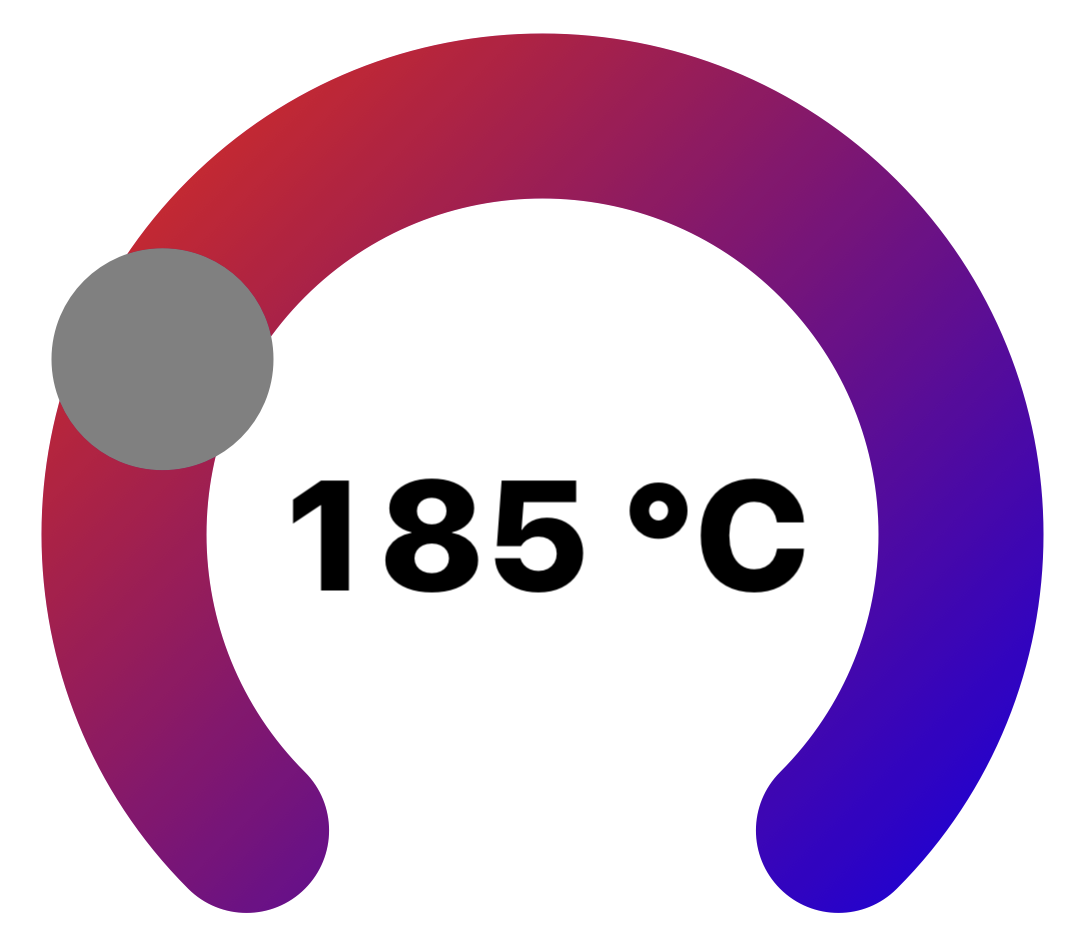 First pass at a temperature slider, with the incorrect gradient :(
It’s certainly not bad, but I was extremely bothered by the fact that I could not figure out how to get the gradient to look the way I wanted. CoreGraphics only supported drawing linear or radial gradients, so I knew I had to be missing something – after all, a radial gradient sure sounds like what I’m after.
Aside: Types of Gradients
There are many different types of gradients, but there are three major kinds that we commonly have to deal with when trying to draw user interfaces:
Thankfully, I had just conflated radial and conic gradients, which meant I could draw this control without any images. Unfortunately for me, drawing conic gradients is a pain in the ass and isn’t something easy to do on iOS, using CoreGraphics, out of the box.
Attempt 2
Unsatisfied with the results of drawing the control on the CPU with CoreGraphics, I set out to render the control entirely on the GPU, by leveraging CoreAnimation layers. (On iOS, every UIView is backed by a CALayer; that is to say, UIView really just exists to handle events and layout, while the hard work of rendering is done by CALayer.)
This time drawing the nice pretty gradient is significantly simpler, as not only is there a convenient CAGradientLayer class, but it also supports the conic gradient we’re after.
Rendering the track of the dial is made extremely simple with layers: instead of ~100 lines of CoreGraphics code to set up clipping paths, we can simply use a CAShapeLayer as a mask on the gradient layer. This shape layer has the arc on which the knob rides. Lastly, there’s another shape layer (using the same path) to draw a border.
At this point, I also switched the control over to properly inheriting from UIControl rather than UIView. This gives us stuff like touch event tracking and event callbacks (for various states) completely for free and especially simplifies touch handling.
Once I was satisfied with the drawing, I added support for haptics when dragging the slider based on the UISelectionFeedbackGenerator class in UIKit. This takes care of all the funky Haptic Engine stuff in the background; just call a function whenever you want to make it go.
Yet to be done is adding accessibility support to the control; Apple frameworks make this quite easy (just needing to implement a few custom methods) but I didn’t get around to it in the span of the weekend4.
 Yay! A more correct gradient :D
If you’re after a decently basic circular slider control, check out the code on GitHub.
Fire
I’ll be the first to admit that this part of the UI is entirely useless. But I had a little bit of time left over in my weekend and perhaps been a little overly eager to test the app, so obviously, now I needed to find a way to make the app be on fire.
It turns out this is (surprisingly) simple. CoreAnimation brings us the CAEmitterLayer class, which implements a whole ass particle system. I’m not kidding – I have no idea when you’d use this outside of a game (well, I do, for confetti and stuff) – but it’s been with us since the iOS 5 days. (I’m honestly a little surprised this is the first I’m hearing of it: I love stupid effects like that.)
The height of the fire can be adjusted (in the app, it’s based on the actual temperature of the device) which simply scales some of the particle’s configuration variables.
Other Stuff
There are a few other parts to this app that aren’t as pretty (or even visible at all) as the user interface that still deserve a little bit of attention.
Persistence
I needed a way to store information about paired devices, such as their serial number, device type, and anything else needed to reconnect them later. Since this data isn’t particularly complex (nor will there be much of it,) it’s very tempting to just create some structs and read/write them to a local file; or, perhaps even simpler, just use an array of dictionaries.
But doing things the easy, simple, and straight-forward way is not what I do.5
Instead, I chose to use the CoreData framework provided by Apple. This is probably one of my favorite frameworks on all platforms: it makes extremely robust local (and remote!) storage dead simple and can provide excellent performance since it uses SQLite as its data store.
At some point since the last time I did iOS apps, Apple added the NSPersistentContainer class. This dude encapsulates all the boring setup required for a CoreData context. This brings the lines of code required to initialize the context down to a dozen or so. It also provides seamless support for executing long-running operations on background queues.
And, as a bonus, with CoreData you get free support for NSFetchedResultsController which makes binding tables (with automatic updating!) to CoreData models a breeze.
Settings
While I could have just gone and created a settings bundle (which would show up in the iOS system settings app) I added it as an additional tab on the main screen of the app. Like the iOS app settings, I wanted to mirror the table view style of the app.
However, anyone who’s worked with iOS will know that setting up an UI like that, using a UITableView is a whole bunch of work, with tons of boilerplate, especially when it comes to building custom entry table cells.
I discovered the Eureka library, which provides a declarative syntax for building table view UIs like that. You don’t even have to write any table view data source methods anymore: just subclass their custom view controller type, build your form, and off you go.
Beyond the settings screen, it’s also used for the device info view controller. This’ll probably be a library I end up using in any subsequent iOS projects – it’s just too damn convenient not to.
Conclusion
All in all, this was a fun adventure back into iOS land, where I got my start doing serious development over a decade ago. And unlike most of my projects, this one actually did (for the most part) get finished in just a weekend. I think that’s definitely a testament to how easy Apple makes it to develop for their platforms. Xcode certainly was a refreshing change from building custom Linux distros and embedded firmware…
If you’re interested in the source of the app, it’s available on GitHub under the ISC license. It should build with any reasonably recent Xcode version, with all external dependencies fetched using Swift Package Manager. It has some rough edges and I wouldn’t exactly call it production quality, but it’s good enough for my uses.
At the time of writing, the app supports only the Pax 3 and Pax Era: the two devices I own. It should be modular enough (and some of the UI is explicitly designed to support it) to handle other manufacturers’ devices, so feel free to open a PR to add support for new device types. It also only works on iPhone: Core Bluetooth is available on all Apple platforms, so there’s no reason this couldn’t be ported to iPad, Watch, or even tvOS in the future.
tl;dr: how do acquire
If you came here looking for a simple download link or even an App Store link – sorry! However, installing the app on a device is relatively easy, given that you’ve access to a machine with Xcode installed. Simply download the GitHub repository, open the provided Xcode project, and hit the run button. (You may need to refer to Apple documentation on how to prepare your device for development.)
Open Questions
At this point, most of the core functionality of the devices can be controlled with the app. However, I’ve noticed with the Pax 3, there’s an offset in the temperature displayed by my app (which takes the values sent from the device as-is) and the official iOS Pax app. Specifically, the values indicated by my app are ~10-15°C higher than the official app. This lines up with my totally subjective observations that my app somehow resulted in less vapor production at the same settings.
There’s the HeaterRanges message (type 17) that may be related: It’s an array of temperature values, sent by the device on connection – perhaps there’s some sort of interpolation or per-device calibration going on that I haven’t implemented.
On the other hand, temperature settings on the Pax Era seem to match exactly what the first-party app displays; yet that device also sends the HeaterRanges message.
Also, there is not yet any support for changing device settings (color scheme, indicator brightness, haptics, etc.) though adding support for this should be relatively trivial.
Disclaimer
I wrote this app for my personal use; therefore, I make no guarantees and provide it with no warranty that it will work for you. While I took great care to make sure the app behaves as similarly to the official app as possible, there may be discrepancies. So, please don’t write me hate mail if that’s the case. Likewise, don’t sue me if your device spontaneously combusts.
Additionally, Pax 3 and Pax Era are trademarks of Pax Labs. No ownership or permission to use the trademarks is implied. (And, if anyone from Pax Labs is reading: hi! I would love to know how much of my reverse engineering is correct 😉)
And, of course, as with any web-thing these days, there’s a boatload of tracking stuff going on. Any time a device is connected, the app makes a request to the server with a bunch of device information. ↩
I found this Silicon Labs documentation helpful at explaining how the advertisement data is put together. ↩
Feel free to get in touch if you have more info or ideas on how this data is structured. The first two bytes seem to be some sort of bit field, and I haven’t really dug into the purpose of the remaining data after the serial. Maybe it is time to break out the device firmware dumps… ↩
I try to make the stuff I produce be relatively accessible, but unfortunately custom controls require a fair but of work to work at all. ↩
Hopefully by now you’ve figured out I have to overcomplicate and overengineer everything. ↩