Despite what the general silence on this topic might imply, quite a few things have changed in the land of 68komputer since the last time I wrote about it. For one, there’s completely new hardware based around a 68000 with a full 16-bit data path. And, a boot ROM and firmware that’s a bit more… inviting.
New Hardware
The most significant change in 68komputer land is that I designed entirely new hardware, from scratch. The original 68komputer was based around a 68008 – which is just a 68000 with an 8-bit data bus – so I wanted a machine that had a full 16-bit data bus. I had drawn up a design and built some boards right before the pandemic started. Those never quite worked and I hadn’t gotten around to debugging them much further… until a few months ago when I no longer had an EAGLE license. Oops.
Thankfully, the 68k is a pretty easy to work with processor, and designing a nice CPU board wasn’t too terribly difficult: especially now that I’m more used to the KiCad way of doing things. I’ve got a buttload of these DIN 41612 connectors in my parts stash, as well as some nice 19” VME crates to mount the boards in.
 Pretty 3D render (shoutout KiCad) of the new CPU board. The 68000 goes in the large socket on the left side of the board.
As far as the actual hardware goes, there’s nothing too crazy compared to the original 68komputer: most memory components are just doubled up to fill the 16-bit wide bus. Most notably, there are far more surface mount devices, which allowed me to cram some more peripherals on the board:
- Motorola 68000 at 8MHz
- 1MByte of static RAM (main system memory)
- 1MByte of flash (boot ROM, toolbox routines)
- XR68C681 Dual UART
- 32KBytes of NVRAM, plus real time clock
- An I²C host interface
- Dual SAA1099 sound generators
Hopefully, the choice to solder down the flash chips, rather than making space for DIP sockets1 won’t be much of a limiting factor; once they’re programmed with even the boot ROM that supports loading software via serial, this will be a non-issue.
IO
Compared to the original 68komputer, there’s not a whole bunch that’s changed in terms of user IO. The same DUART provides two serial ports: the first of which is connected to an RS232 transceiver, and used as the “console” port of the system; the second of which is exposed at TTL level on some pin headers. The DUART also provides some GPIO, which is used to realize status/error LED indicators, and read the status of some DIP switches, useful for configuration.
Notably, this board also features a PCF8584 to provide an I²C host. This bus is used for controlling the backplane and detecting expansions, but it’s brought out to a pin header for easy (ab)use down the road.
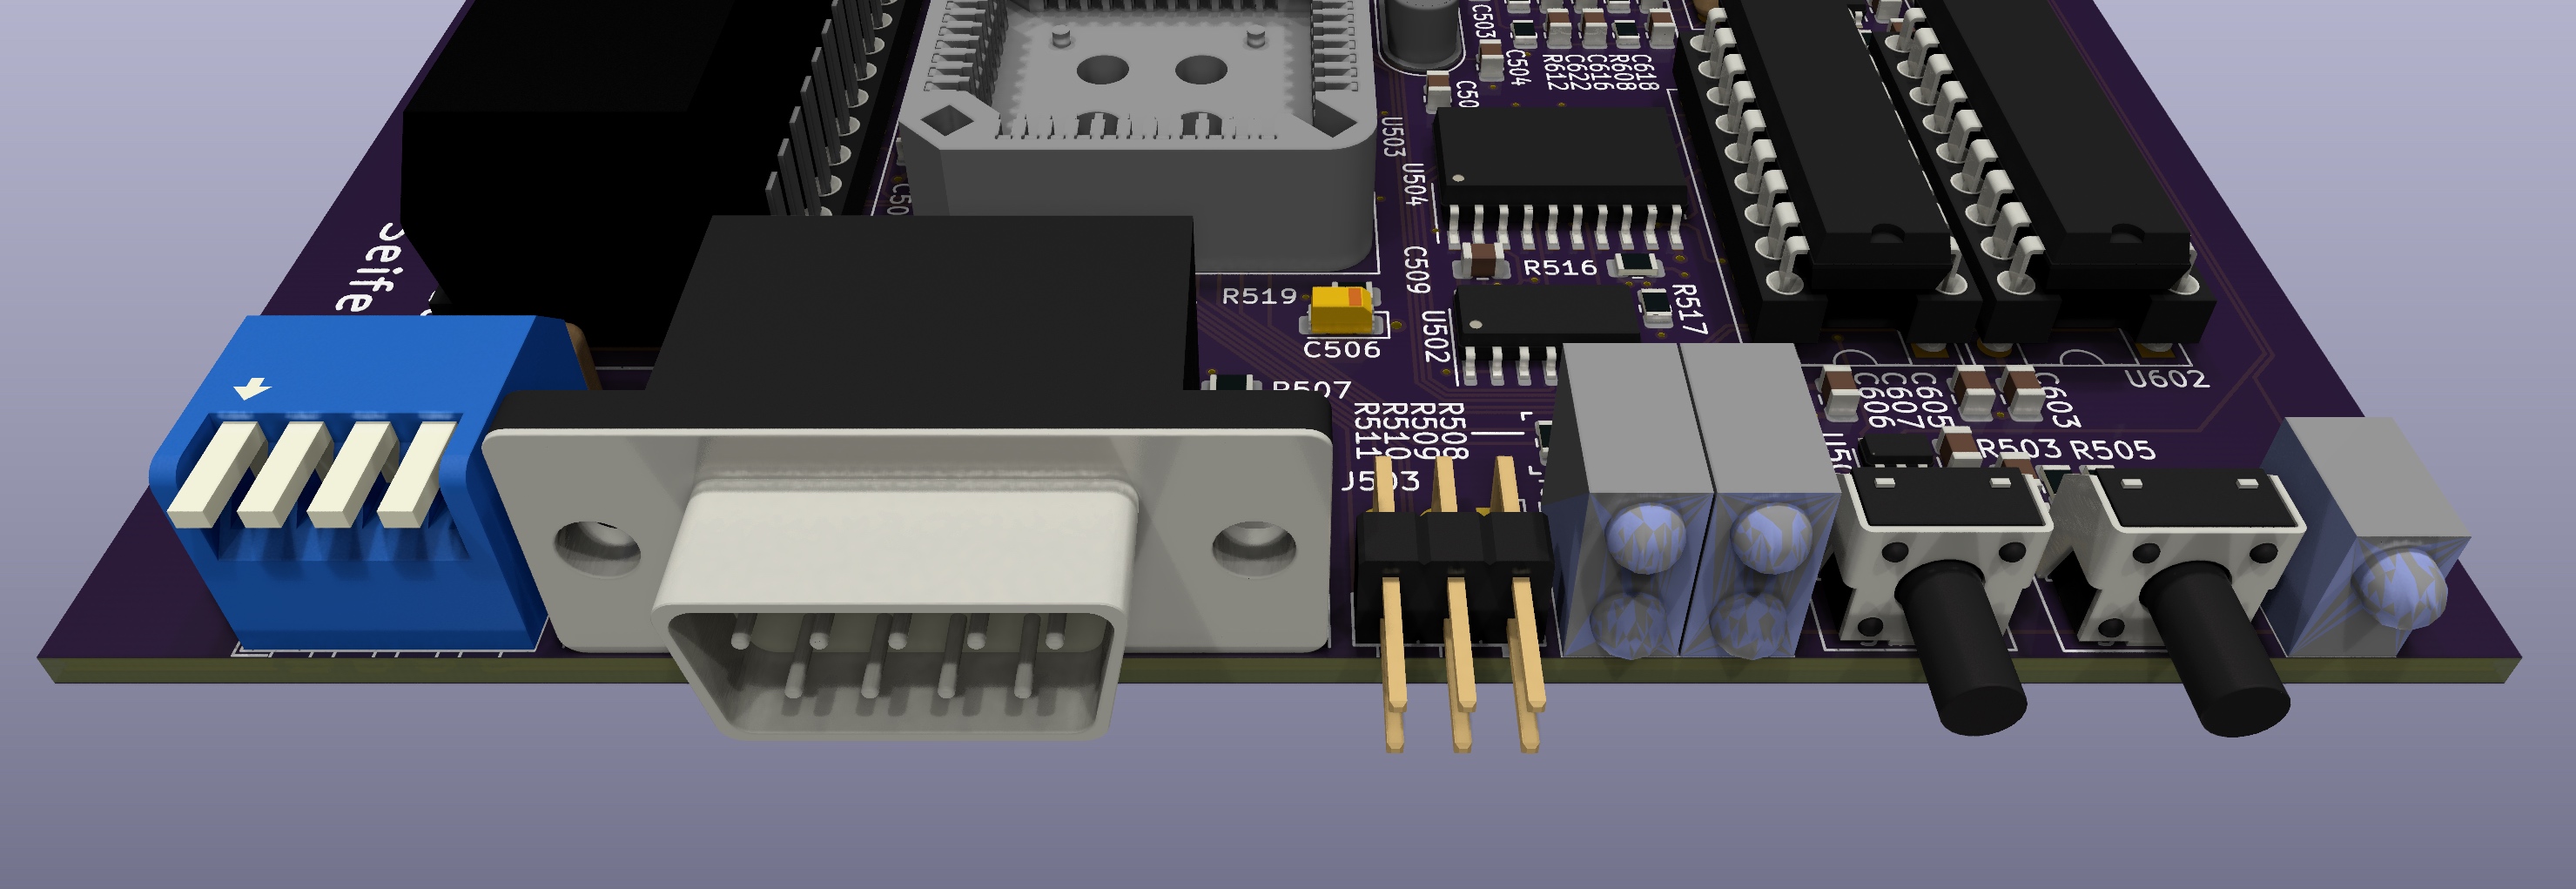 Front of the CPU board. From the left: Config DIP switches, Console port (UART A), UART B, status LEDs, NMI and reset buttons, power LED.
Expansion
This time around, I didn’t leave expansion as an afterthought thrown on a random 64 pin header. Expansion will work through a backplane, which basically just holds a full 68k bus. The CPU board connects to this backplane through a DIN 41612 connector, which also provides power, among other things.
At the end of the day, though, expansion is still just the raw CPU bus, albeit with directional buffers on the CPU card, to allow it to drive up to 8 cards of expansion. These buffers are steered by some GALs on the CPU board, ensuring they’re fully transparent even to external bus masters. I thought about implementing something like VMEbus, but that seemed like a lot of effort.
Autoconfiguration
Additionally, there’s an I²C sideband channel to allow for automatic detection of devices. The backplane will contain a bus switch, to allow the bus to be connected to only one slot at a time. Each expansion card should have a serial EEPROM with configuration information on the card, and can also have additional hardware (such as IO expanders or supervisory circuits) connected to the bus. The idea is that the boot ROM can enumerate the bus, load any drivers, and allocate address resources without any user intervention.
There are even some serial EEPROMs out there, such as the AT24CS32, which come pre-programmed with a unique serial number. I don’t really have a reason to have serial numbers for what is a hobby project at best, other than that it’s kind of neat.
Configuration contained in these EEPROMs would indicate the resources required by the board, as well as the presence of any accessory ROMs on the board. These would contain driver code, loaded by the boot ROM; I write more about this below in the software section further below.
Interrupts
External peripherals can assert interrupts, which are raised as level 4 interrupts on the processor. Each slot has a daisy-chained interrupt request line, which handles arbitration of interrupt requests between cards.
To easily support arbitrary expansion peripherals, interrupts aren’t autovectored; instead, it’s expected that the peripheral that triggered the interrupt places the interrupt vector number to call on the bus. Most 68k-style peripherals implement this convention, but it should be simple enough to implement with just a basic latch.
Miscellaneous
Processor reset is generated by a TL7733 voltage supervisor. These are super neat parts that will hold the processor in reset until the power rail has been stable for some time. They also feature an external reset input, which makes hooking up a reset switch real simple.
The board is also 4 layers around this time, rather than 2. There’s no practical (e.g. signal integrity or density) reason, but getting a 4 layer PCB made is not that much more expensive than a quality 2 layer board, particularly with many overseas fabs that have been popping up recently. If nothing else, it makes routing power and ground for every chip dead simple 😌
Building Toolchains
Of course, this fancy new hardware is nothing without some equally fancy new software to go along with it. While 68k assembly is great I wanted to go with something higher level this time around, primarily since that makes development so much simpler. I tried a few things before something worked:
Rust for 68k
I’ve been getting more and more into Rust, thanks to a few projects at work, and wanted to use it for my next embedded project. Once I figured out that Rust added m68k support recently, I wanted to try it out immediately. Building a Rust toolchain from source isn’t too bad, even on Windows. I had no reason to doubt this would be any different.
How wrong I was.
Oh, how incredibly wrong and foolish I was to assume that. Without a doubt, this critical assumption doomed me to failure from the start. (Or maybe this is actually experimental and poorly supported, but this explanation is more amusing to me.)
I got as far as the second stage of the toolchain compilation process, after LLVM and other dependencies were built. But then the Rust compiler would crash, which is a bit of a problematic situation to find yourself in. I wasn’t able to figure out what was going on, so I turned to my backup plan.
C++ for 68k
Next up I tried compiling the latest llvm/clang from source, since it also added m68k support earlier this year with llvm-13 this fall. This proved to go much better since I could get all the way through the compilation process without crashing.2
With a working toolchain, I proceeded to glue it to a CMake build system and got started writing the new boot ROM. Pretty quickly, though, I ran into issues. Compiling C and C++ for m68k worked perfectly fine, and produced object files with valid 68000 instructions. I could not get over writing 68k assembly in AT&T syntax, though, so I stuck with vasm for assembler code.
The actual issue came from trying to link all this into an executable with a custom linker script. A little bit of fighting later, and I got lld, the llvm linker, built and used for linking instead. Only to then figure out that the m68k support in llvm didn’t extend to its own linker. Whoops.
Thankfully hacking together enough support into the linker to build freestanding static executables was simple enough. The 68k doesn’t have that many addressing modes, especially not ones that the compiler outputs relocations for. This is all encapsulated in a TargetInfo struct inside the linker:
1
2
3
4
5
6
7
8
9
10
11
12
13
14
15
16
17
18
19
20
21
22
23
24
25
26
27
28
29
30
31
32
33
34
35
36
37
38
39
40
41
42
43
44
45
46
47
48
49
50
51
52
53
54
55
56
57
58
59
60
61
62
63
64
65
66
67
68
69
70
71
72
73
74
75
76
77
78
79
80
//===- M68k.cpp -----------------------------------------------------------===//
//
// Hacks to get Motorola 68000 stuff linking
//
//===----------------------------------------------------------------------===//
#include "InputFiles.h"
#include "Symbols.h"
#include "Target.h"
#include "lld/Common/ErrorHandler.h"
#include "llvm/Object/ELF.h"
#include "llvm/Support/Endian.h"

using namespace llvm;
using namespace llvm::object;
using namespace llvm::support::endian;
using namespace llvm::ELF;
using namespace lld;
using namespace lld::elf;

namespace {
class M68k final : public TargetInfo {
public:
  M68k();
  RelExpr getRelExpr(RelType type, const Symbol &s,
                     const uint8_t *loc) const override;
  void relocate(uint8_t *loc, const Relocation &rel,
                uint64_t val) const override;
};
} // namespace

M68k::M68k() {
    // illegal opcode
    write16(trapInstr.data(), 0x4afc);
}

RelExpr M68k::getRelExpr(RelType type, const Symbol &s,
                           const uint8_t *loc) const {
    switch (type) {
        case R_68K_NONE:
            return R_NONE;

        case R_68K_32:
        case R_68K_16:
        case R_68K_8:
            return R_ABS;

        case R_68K_PC32:
        case R_68K_PC16:
        case R_68K_PC8:
            return R_PC;

        default:
            error(getErrorLocation(loc) + "unknown relocation (" + Twine(type) +
                  ") against symbol " + toString(s));
            return R_NONE;
    }
}

void M68k::relocate(uint8_t *loc, const Relocation &rel, uint64_t val) const {
    switch(rel.type) {
        case R_68K_16:
        case R_68K_PC16:
            checkIntUInt(loc, val, 16, rel);
            write16(loc, val);
            break;
        case R_68K_32:
        case R_68K_PLT32:
            write32(loc, val);
            break;

        default:
            error(getErrorLocation(loc) + "unrecognized relocation " +
              toString(rel.type));
    }
}

TargetInfo *elf::getM68kTargetInfo() {
  static M68k target;
  return ⌖
}
Once this new class got plumbed in to the rest of lld, armed with a custom linker script this produced valid looking ELF binaries. Once I yanked out the .text section into a raw binary file, I had what looked like a fully functional boot ROM.
So I loaded it in the emulator, hit run, and watched in horror as everything crashed after printing a single character. After ruling out my 68000 emulation core (which still is missing quite a few instructions) I dug into this a bit more, and everything pointed to a compiler bug. A word would get corrupted on the stack between function calls, which led to weird results.
I did briefly try to look llvm to try and fix this but gave up not long after. As much as I wanted to use clang over gcc, I really didn’t want to waste days without the guarantee of a working toolchain at the end. Maybe I’ll get around to cleaning up my lld changes and submitting them upstream, but I don’t have the confidence to validate them if I can’t get clang working right.
GCC to the Rescue
A phrase I never once thought I’d say, but meh. I knew that gcc would produce working code for the 68000. Fully expecting to have to build this from source, too, I was pleasantly surprised when I found out that since I last worked on 68komputer, someone way smarter than me put together some Homebrew formulas for building gcc m68k toolchains.
Best of all, this wasn’t limited to some ancient GCC version: I was able to pull down and install GCC 10, which is recent enough that it supports C++20 more or less. Thankfully, once I got this toolchain working, and compiled the boot ROM code with it, things started magically working.
Now I’ve got this absolutely cursed setup of GCC to compile, and lld to link the binary, but hey, it works. (I’m sure the gcc linker would work too, but I’m too attached to my shitty lld little patch. I haven’t been able to get GCC to compile natively on my M1 MacBook, though, so I’m just using the amd64 build I created on my desktop for the time being.)
Boot ROM
With a shiny new C++ toolchain in hand, I started working on a new boot ROM. There’s really very little reason to be writing much of this in assembly, since I have plenty of flash space available, and there’s not much that’s performance critical enough to warrant going down all the way to assembler.
Plus, I was inspired by a certain CppCon talk that there’s really no platform too weak for modern C++.
Features
The boot ROM doesn’t have to do a whole lot. Roughly, I wanted the following features out of it:
- Automatic discovery of connected peripherals, via the backplane’s I²C bus. Peripherals can provide driver code, which is loaded and executed by the boot ROM. This way, a serial expansion or video card can be used as the system’s default console without any boot ROM support.
- Basic system configuration, primarily to do with serial baud rates and what program is executed on boot
- Debugging helpers, such as downloading arbitrary code into RAM, and default exception handlers
- Expose a few services and helper routines to code running on the system, abstracting away IO into traps into the ROM. This goes hand-in-hand with peripheral drivers, which take advantage of this for transparent application support.
Additionally, since I have loads of flash space, I’d like to find a way to fit as much of the C runtime as possible in the flash, and then simply having apps call these functions in ROM, rather than having to carry the weight of the runtime functions around.
Testing
Since the hardware doesn’t exist (yet…) I needed an emulator of some sort to test this code in. Unlike last time, where I hacked something bespoke together, this time I was actually working on a little emulation framework that came in handy for emulating the 68komputer.
Getting it emulating the new 16-bit machine, with its new peripherals and memory map was as easy as writing a new system definition. It’s actually a decent way of developing this without any hardware to play with yet. The serial ports of the DUART are simply exposed as TCP sockets:
There are many limitations with this approach, especially that timings aren’t (yet) emulated, and those peripherals that are implemented are incomplete. However, it’s a great proof of concept of Emulashione, and a sanity test for the firmware I’m writing.
So far, I’m happy with the progress I’ve made on the boot ROM: It’s only about 9K in size, but is already starting to do useful things, and that’s without any size or performance optimizations enabled.
Conclusion
That’s what’s new in the world of 68komputer. As I’m writing this post, the boards for this new revision have just shipped, my big Mouser order is chilling in a UPS facility somewhere in Oregon3, and I am officially off work until 2022. For now, I’m just working on the boot ROM and some supporting software.
Hopefully, I’ll have a working board assembled before the end of the year: stay tuned for updates. As always, the PCB files and source code are available on my GitHub on some new spicy branches. And I’m sure I’ll have a post here the second I get a board working to brag about it.
Update: The boards and parts arrived near the end of the year, and I had a crack at assembling one. Check out the update post for details.
Really, the best choice would be a ZIF socket to make swapping the chip between the board and programmer much less risky, but if you’ve followed my original 68komputer build, you’ll remember I’m physically incapable of making them fit on boards… ↩
I wish I were kidding when I said I’ve compiled llvm dozens of times the last month, but thankfully my 32 core Mac Pro manages a clean llvm build in about 10 minutes. Impressively enough, my M1 MacBook Pro doesn’t take significantly longer. ↩
One of the few benefits to living in College Station was it’s about an hour’s drive from Mouser’s warehouse; packages arrived overnight with cheap UPS Ground shipping, and on more than one occasion I just drove there myself for will call pickup. ↩